

Connecting RV water equipment can seem simple until you discover that the campground spigot, pressure regulator, filter, softener, and RV city-water inlet may all use different connection standards. A fitting that appears to be the right size may still leak, cross-thread, or fail to seal if its thread type is wrong.
A 1/2 pex to garden hose adapter provides a clean transition between 1/2-inch PEX tubing and the 3/4-inch garden hose connection used by many RV water accessories. It is useful for inside-mounted filtration systems, permanent plumbing modifications, winterizing ports, tank-fill arrangements, and other projects where you want to connect PEX tubing to a hose-threaded component.
The key is to treat the connection as a series of specific interfaces:
1/2-inch PEX tubing → PEX fitting → pipe-thread or hose-thread adapter → garden hose connection with a washer
The adapter does not make every thread interchangeable. You still need to identify the connection on each side, choose the correct gender, use the proper seal method, and support the plumbing so the fitting is not carrying the weight of a hose or filter assembly.
Why RV water connections use different standards
RV water systems combine residential-style plumbing, flexible hose connections, compact filtration equipment, and campground hardware. Each part is designed for a slightly different job.
A campground spigot is usually intended for a garden hose. That makes a straight 3/4-inch garden hose thread, commonly identified as GHT or 3/4-11.5 NH, convenient for connecting and disconnecting hoses frequently.
An RV city-water inlet may also use a garden hose connection because the owner typically connects and removes a potable-water hose at every campsite. External RV filters, pressure regulators, and portable water softeners often use garden hose thread for the same reason.
Inside the RV, however, the plumbing is commonly built with PEX tubing. PEX is compact, flexible, and suitable for permanent plumbing runs. It is joined with barbed crimp fittings, clamp fittings, or push-to-connect fittings rather than by threading the tubing itself.
Filter housings and manifolds can introduce another standard: NPT, or National Pipe Thread. NPT is common on valves, gauges, plumbing adapters, and some filter components. It is a tapered pipe thread and seals differently from GHT.
These systems can work together, but only when a fitting is used to make the transition.
The three connection types RV owners encounter
1. Garden hose thread: GHT, NH, or 3/4-11.5
Garden hose thread is often marked as:
- 3/4-inch GHT
- 3/4-inch NH
- 3/4-11.5 NH
- MHT, meaning male hose thread
- FHT, meaning female hose thread
The “3/4-inch” designation does not refer to the actual outside diameter of the male thread in the same way that a plumbing pipe size does. Standard garden hose thread has approximately 11.5 threads per inch and is a straight, parallel thread.
GHT connections seal against a flat washer. The washer is normally inside the female hose swivel, such as the end of a drinking-water hose or a female hose-thread adapter.
The threads position and hold the connection together, but the washer creates the water seal. For that reason, applying PTFE tape to a garden hose thread usually does not solve a leak. It can interfere with proper seating of the washer and may make the connection difficult to tighten correctly.
2. NPT tapered pipe thread
NPT fittings are used on many valves, filter ports, pressure gauges, and plumbing adapters. NPT threads are tapered, meaning the diameter gradually increases along the threaded section. As the male and female threads engage, they wedge together.
NPT seals through thread interference, normally with a suitable thread sealant such as PTFE tape or pipe-thread compound. A 3/4-inch NPT fitting is not the same as a 3/4-inch garden hose fitting. The thread pitch, profile, diameter, and sealing method differ.
Some RV components use 1/2-inch NPT ports. Others use 3/4-inch NPT ports. Always confirm the port marking instead of relying only on an approximate measurement.
3. PEX connection systems
PEX tubing is not joined by screwing the tubing onto a thread. Instead, the tubing connects to a fitting using one of several methods:
- PEX barb and crimp ring: The tubing slides over a barbed fitting and is secured with a copper or stainless crimp ring.
- PEX barb and clamp: A stainless clamp is tightened around the tubing and barb.
- Push-to-connect fitting: The tubing is inserted into a fitting that uses an internal grab ring and seal.
- PEX-to-thread fitting: One side accepts the PEX tubing while the other side provides male or female NPT or another threaded connection.
A fitting described as “1/2-inch PEX” is intended for nominal 1/2-inch PEX tubing. It is not necessarily the same as a 1/2-inch pipe thread. The PEX side and threaded side must be identified separately.
GHT and NPT are not interchangeable
GHT and NPT can both appear on fittings labeled “3/4-inch,” but that does not make them compatible.
| Feature | 3/4-inch GHT/NH | 3/4-inch NPT |
|---|---|---|
| Thread shape | Straight or parallel | Tapered |
| Typical pitch | 11.5 threads per inch | 14 threads per inch for 3/4-inch NPT |
| Primary seal | Flat rubber washer | Thread interference |
| Thread sealant | Normally not used | PTFE tape or pipe-thread compound is normally used |
| Common RV use | Hoses, campground spigots, portable filters, regulators | Valves, gauges, manifolds, plumbing ports |
| Typical connection method | Hand-tighten the swivel against a washer | Thread male and female pipe fittings together with sealant |
Because the geometry is different, a GHT fitting should not be forced into an NPT port. You may be able to start the threads for a turn or two, especially with brass components, but the fitting will not seat correctly. Continuing to tighten can damage the threads and leave a connection that leaks under pressure.
The reverse is also true: an NPT fitting should not be screwed into a garden hose swivel as a substitute for the correct hose-thread adapter.
If a filter has an NPT port and you need to connect a garden hose, use a fitting designed for that transition. For example, the assembly may be:
1/2-inch PEX tubing → 1/2-inch PEX-to-FPT fitting → 1/2-inch MPT-to-3/4-inch FHT adapter → hose with washer
The exact sequence depends on the port sizes and the required male/female arrangement.
Where a 1/2-inch PEX to garden hose adapter is used
A direct PEX-to-garden-hose adapter is useful when the equipment or hose connection is located inside the RV or when you are building a semi-permanent installation.
Plumbing a filter into an interior PEX line
An inside-mounted RV filtration system may be installed in a cabinet, utility compartment, or near the city-water entry point. The RV’s existing water line may be 1/2-inch PEX, while the filter manifold or related component may use a hose-thread connection.
The adapter lets you transition between the permanent PEX plumbing and the removable hose-style connection without trying to force the wrong thread into the filter port.
RV Water Filter Store offers whole RV water filtration systems, including systems designed for inside installation with 1/2-inch PEX connections. Choose the system and fitting arrangement based on the available space, the existing plumbing, and whether you want the filter to remain permanently installed or removable.
Adding a winterizing or tank-fill port
A PEX-to-GHT transition can be used to create a dedicated connection for a winterizing hose, tank-fill hose, or temporary flushing arrangement. A shutoff valve should be installed where appropriate so the new port cannot unintentionally become an open path into the plumbing system.
Label the port clearly. A connection used for winterizing may not be intended for normal pressurized operation unless the components are rated and installed for that use.
Connecting a permanent filter housing to PEX
Some RV owners prefer to hard-plumb a filter housing rather than leave a hose running through a compartment. This can reduce loose hose loops, but it also makes component placement and service access more important.
Leave enough room to remove filter sumps, replace cartridges, shut off the water, and catch residual water. Avoid mounting the adapter or tubing where vibration, cabinet movement, or cartridge removal puts force on the fitting.
Adapting a hose-threaded softener or filter assembly
Portable water softeners and external filtration systems commonly use garden hose connections because they are installed between the campground faucet and the RV hose. A PEX-to-GHT adapter is more relevant when a softener or filter component is being incorporated into a permanent or semi-permanent interior plumbing layout.
A portable unit should not be permanently installed simply because an adapter makes the threads fit. Check the manufacturer’s flow direction, pressure limits, regeneration requirements, and service instructions before changing how the equipment is connected.
Parts required for a reliable connection
The parts list depends on the equipment, but most projects use some combination of the following:
-
1/2-inch PEX tubing
Confirm that the tubing is actually 1/2-inch nominal PEX and that it is suitable for potable-water use. -
PEX fitting
This may be a barb for crimp or clamp installation, or a push-to-connect fitting. -
PEX-to-thread adapter
The threaded side may be male NPT or female NPT. Match it to the device port. -
Thread-to-GHT adapter
Use a fitting that specifically identifies the hose-thread side as GHT, NH, MHT, or FHT. Do not substitute an NPT fitting. -
Flat hose washer
A female GHT swivel requires a washer. Inspect it for flattening, cuts, or distortion. -
Correct crimp ring, clamp, or push-to-connect hardware
The securing method must match the fitting and tubing system. -
Shutoff valve
A valve can make filter service, winterizing, and leak diagnosis much easier. -
Pressure regulator and gauge, when appropriate
A regulator protects the RV plumbing from excessive campground pressure. It should be installed according to its flow direction and manufacturer instructions. -
Support bracket or clamp
A hose, filter housing, or softener should not hang from a small PEX fitting.
You can browse parts and fittings for adapters, washers, PEX-related fittings, thread sealant, and other plumbing components. For removable filter or hose arrangements, quick connects may be useful, provided the connection is rated for the intended water pressure and application.
Decision table: choose the connection by job
| Job | PEX side | Equipment or hose side | Connection to select | Seal method |
|---|---|---|---|---|
| Connect 1/2-inch PEX to a female garden hose end | 1/2-inch PEX barb or push-to-connect | Male 3/4-inch GHT | 1/2-inch PEX × male GHT adapter | PEX crimp, clamp, or push fitting; hose washer |
| Connect 1/2-inch PEX to a male hose-thread outlet | 1/2-inch PEX fitting | Female 3/4-inch GHT | 1/2-inch PEX × female GHT adapter | PEX connection; hose washer |
| Connect PEX to a filter with a female NPT port | 1/2-inch PEX fitting | Male NPT matching the filter port | PEX × MPT fitting | PEX connection; sealant on NPT |
| Connect PEX to a filter with a male NPT port | 1/2-inch PEX fitting | Female NPT matching the filter port | PEX × FPT fitting | PEX connection; sealant on NPT |
| Connect an NPT filter port to a garden hose | NPT fitting or adapter | 3/4-inch GHT | NPT × GHT adapter | Sealant on NPT; washer on GHT |
| Add a removable filter section | PEX or GHT | Quick-connect pair | Correctly sized quick-connect set | Follow connector instructions; washer or O-ring as designed |
| Connect an external campground filter | Garden hose | Garden hose | Hose, regulator, filter, and softener in the correct order | Washers at hose-thread swivels |
Gender descriptions are important. “Male hose thread” and “female hose thread” refer to the garden hose side, not the PEX side. Before ordering, sketch the connection from left to right and write down whether each port has internal or external threads.
Step-by-step assembly
Step 1: Shut off water and relieve pressure
Turn off the campground faucet or RV water pump. Open a nearby faucet briefly to release pressure before cutting tubing or loosening a fitting.
If the RV is connected to shore water, disconnect the hose or close the supply valve. Do not work on a pressurized line.
Step 2: Identify every connection
Look at the existing equipment and mark each interface:
- 1/2-inch PEX tubing
- PEX barb, clamp, crimp, or push fitting
- Female or male NPT
- Female or male GHT
- Washer, O-ring, or flat sealing surface
Do not assume that an adapter labeled “3/4-inch” is a garden hose adapter. Confirm that it says GHT, NH, MHT, or FHT when a hose connection is required.
Step 3: Plan the assembly
A simple direct assembly might be:
1/2-inch PEX tubing → 1/2-inch PEX-to-male-GHT adapter → female hose swivel with washer
A more involved assembly might be:
1/2-inch PEX tubing → PEX-to-FPT adapter → MPT-to-FHT adapter → female hose swivel with washer
Keep the number of transitions reasonable. Every additional fitting creates another potential leak point and may make the assembly harder to support.
Step 4: Prepare and connect the PEX
Cut the PEX squarely with a tubing cutter. Avoid an angled cut, crushed tubing, or a rough edge.
For a crimp or clamp connection:
- Slide the correct ring or clamp over the tubing.
- Push the tubing fully over the fitting barb.
- Position the ring or clamp according to the fitting manufacturer’s instructions.
- Crimp or clamp with the correct tool.
- Check the connection with the appropriate gauge if the system requires one.
For a push-to-connect fitting:
- Cut the tubing square.
- Remove burrs or damaged material.
- Mark the required insertion depth if recommended.
- Push the tubing fully into the fitting.
- Tug gently to confirm that the tube is retained.
Do not use a push-to-connect fitting with tubing that is scratched, oval, dirty, or cut too short to achieve full insertion.
Step 5: Seal only the tapered pipe threads
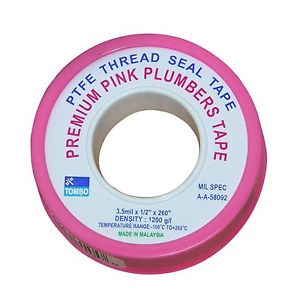
If the assembly includes NPT, apply an approved thread sealant to the male NPT threads. Wrap PTFE tape in the direction of tightening so it does not unwind as the fitting is installed. Keep sealant away from the first thread and do not allow loose tape to enter the water passage.
Do not put PTFE tape on the GHT side. A garden hose connection seals with a washer, not with the threads.
Step 6: Install the GHT connection with its washer
Inspect the female hose swivel and make sure the washer is present and sitting flat. Replace a brittle, flattened, split, or missing washer.
Start the threads by hand. The swivel should turn smoothly for several turns. If it binds immediately, stop and inspect the thread type and alignment.
Tighten the swivel by hand until the washer contacts the mating face. Use pliers or a wrench only for a small additional snugging motion if necessary. Do not use the wrench to force the connection tighter and tighter. Excessive force can distort the washer, damage the swivel, or damage a plastic port.
Step 7: Support the plumbing
Use a bracket, clamp, or mounting plate to support filter housings, manifolds, regulators, and hoses. A fitting should not be used as a structural support.
This is especially important for an inside filter installation. A full filter sump or a hose pulling sideways on an adapter can stress the connection each time the RV moves.
RV Water Filter Store’s hose accessories collection includes components that can help organize removable hose connections and reduce strain in an RV water setup.
Step 8: Pressurize slowly and inspect
Open the supply valve slowly. Watch the connection while pressure builds.
Use a dry paper towel around each joint. A small bead of water may be easier to detect on the towel than by sight. Check:
- The PEX fitting
- The crimp or clamp
- The push-to-connect collar
- Any NPT joint
- Both sides of every adapter
- The flat GHT washer
- Nearby valves and filter housings
Leave the system pressurized for several minutes, then inspect again. Cycle a faucet or appliance if appropriate and check the connection after the pressure changes.
If a GHT joint leaks, shut off the water, remove the swivel, inspect or replace the washer, and reconnect it squarely. Adding more tape to the hose thread is not the normal fix.
Common failure modes
Wrong thread standard
A 3/4-inch NPT fitting may look close to a 3/4-inch GHT fitting. It is not a substitute. Replace it with a correctly identified adapter.
Missing or damaged washer
A female hose swivel without a flat washer will normally leak. The same is true when the washer is cracked, hardened, or installed at an angle.
Over-tightening
More force does not compensate for the wrong seal method. Over-tightening can crush a hose washer, split a plastic port, distort a fitting, or damage threads.
Sealant applied to the wrong side
PTFE tape belongs on tapered NPT threads when required. GHT connections normally need a clean, properly seated washer. PEX push-to-connect fittings do not need thread tape on the tubing.
Incomplete PEX insertion
A tube that is only partially inserted into a barb or push fitting may hold briefly and then leak when pressure changes. Cut the tube cleanly and insert it to the proper depth.
Unsupported hose or filter weight
Side-load from a heavy hose or filled filter can loosen fittings and fatigue tubing. Support the equipment independently.
No pressure regulation
Campground water pressure can vary. A pressure regulator installed at the RV water inlet can help protect the RV plumbing, but it must be correctly rated and installed in the proper flow direction.
Missing backflow protection
A connection that can allow water to flow in more than one direction may require a check valve, vacuum breaker, or other backflow protection depending on the design and local requirements. Do not assume that a simple adapter prevents reverse flow.
Incorrect flow direction
Filters, softeners, regulators, check valves, and some quick connects have a designated inlet and outlet. Follow the arrows or markings. A fitting can be leak-free and still be installed incorrectly if water is flowing through equipment backward.
Troubleshooting table
| Symptom | Likely cause | Corrective action |
|---|---|---|
| Water leaks from a hose swivel | Missing, damaged, or misaligned washer | Shut off water, inspect the washer, replace it if needed, and reconnect squarely |
| Adapter will not start by hand | Wrong gender, wrong thread standard, or cross-threading | Stop; compare the fitting markings and use the correct GHT or NPT adapter |
| Leak appears at NPT joint | Insufficient sealant, damaged threads, or loose joint | Depressurize, clean the threads, apply suitable sealant, and reinstall according to the fitting instructions |
| Leak appears at PEX barb | Tubing not fully inserted or crimp/clamp incorrectly installed | Cut back to undamaged tubing, reinstall, and verify the crimp or clamp |
| Push fitting leaks after installation | Tube is scratched, oval, dirty, or not fully inserted | Cut the tube square, mark insertion depth, and reinstall or replace the fitting |
| Connection leaks only when hose moves | Unsupported hose or side-load on the adapter | Add a bracket, clamp, or hose support |
| Threads tighten immediately and bind | GHT and NPT may be mixed, or threads may be damaged | Remove without forcing, identify both thread types, and replace the incorrect fitting |
| Filter has low flow after installation | Filter restriction, reversed flow, clogged cartridge, or undersized connection | Confirm flow direction, inspect the cartridge, open valves fully, and check the system specifications |
| Water flows backward when supply is off | Missing or failed check valve or backflow device | Review the plumbing design and install the required protection where appropriate |
| Leak returns after replacing tape | The joint may be GHT, where tape is not the sealing method | Remove tape from the hose-thread side and inspect the washer and sealing faces |
A practical checklist before turning the water on
Before pressurizing an RV PEX-to-hose connection, confirm:
- The tubing is 1/2-inch PEX and is in good condition.
- The PEX fitting matches the connection method: crimp, clamp, or push-to-connect.
- The hose side is identified as GHT, NH, MHT, or FHT.
- Any NPT fitting matches the correct nominal pipe size.
- GHT has a clean, undamaged flat washer.
- PTFE tape or pipe compound is used only on tapered pipe threads.
- The fitting starts by hand without binding.
- The filter, softener, regulator, and hose are supported.
- Flow direction matches the arrows or instructions.
- A regulator is installed if needed for the water source and RV plumbing.
- A check valve or backflow device is included where the plumbing design requires one.
- The water is turned on slowly and every joint is checked under pressure.
A 1/2 pex to garden hose adapter is a small part, but it connects two different plumbing systems. The most reliable installation is not the one tightened the hardest. It is the one that matches the thread standard, uses the correct seal, supports the plumbing, and is tested under pressure before the RV is put back into service.
For a permanent filtration project, start by reviewing the available RV water filtration systems, then identify whether your installation uses 1/2-inch PEX, garden hose thread, NPT, or a combination. If you are building a removable arrangement, use the correct fittings and washers from the parts and fittings collection and verify every connection before leaving the campsite.

